> ## Documentation Index
> Fetch the complete documentation index at: https://docs.nemu.com.br/llms.txt
> Use this file to discover all available pages before exploring further.
# Google Ads
> Learn how to properly configure Nemu URL parameters (UTMs) in Google Ads to track your campaigns.
Learn how to add Nemu parameters alongside traditional UTMs to track your sales accurately on Google Ads.
Learn how to add UTM parameters in Google Ads Manager to track your sales accurately.
If you don't understand the difference between traditional UTMs and Nemu UTMs,
[click here](/en/platform/utms/how-they-work) to learn more.
***
## With UTMs configured
1. Sign in to Google Ads.
2. Click on **Settings** and then **Account settings**.
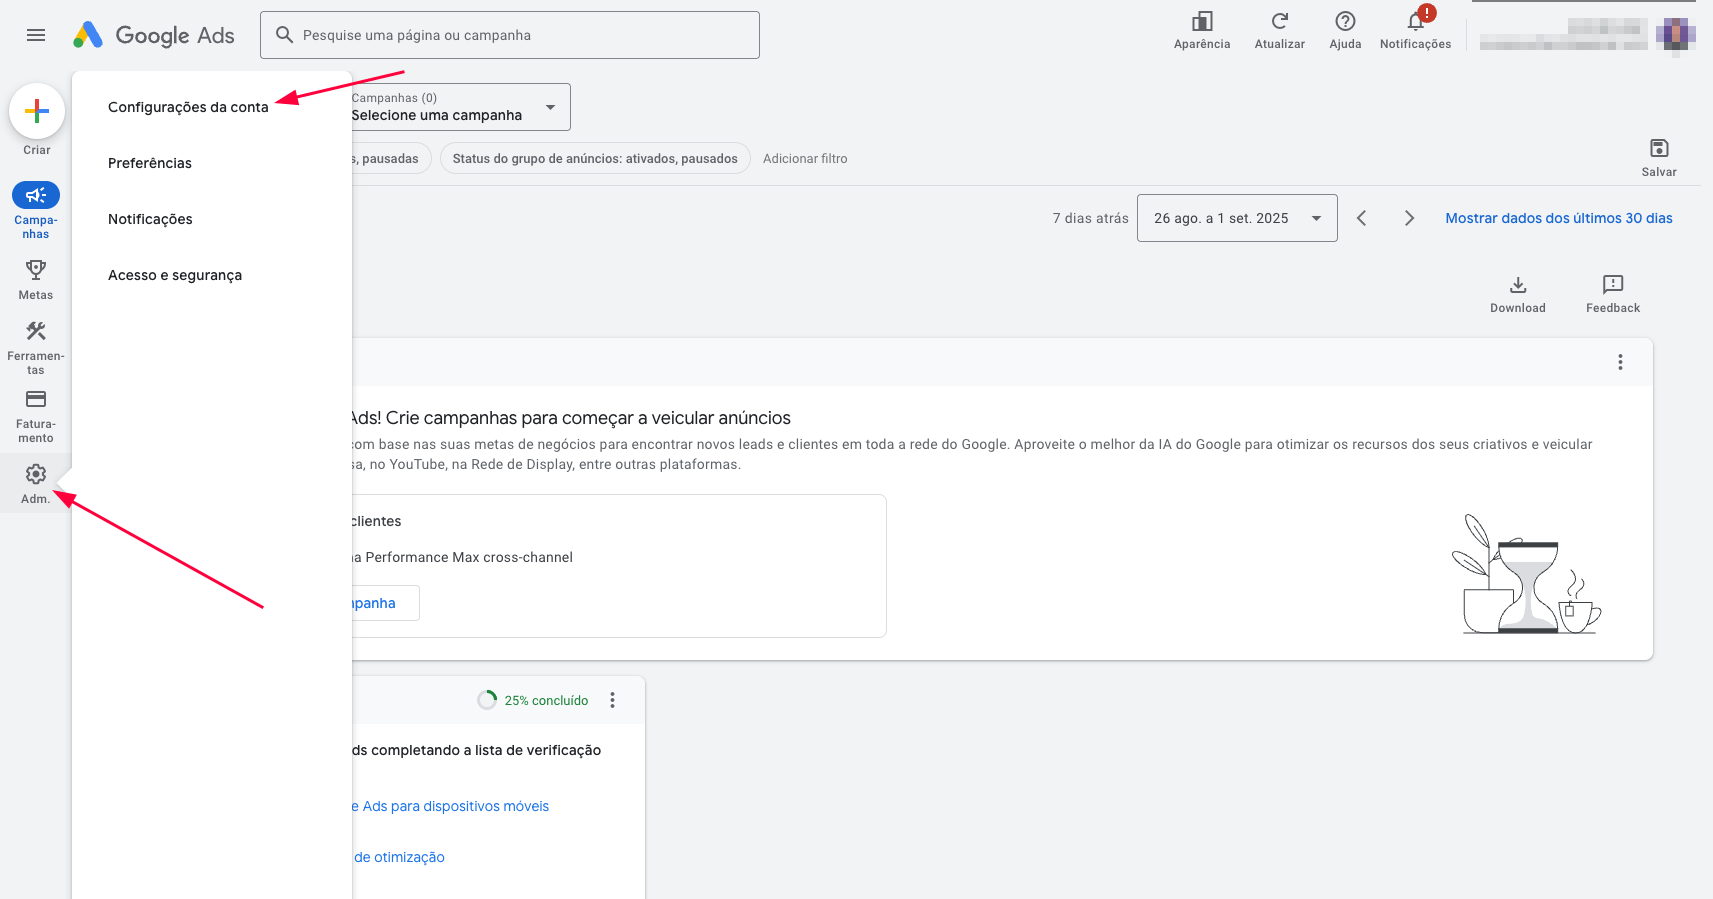 3. Click on **Auto-tagging**, if it's disabled, **enable it** and click on **Save**.
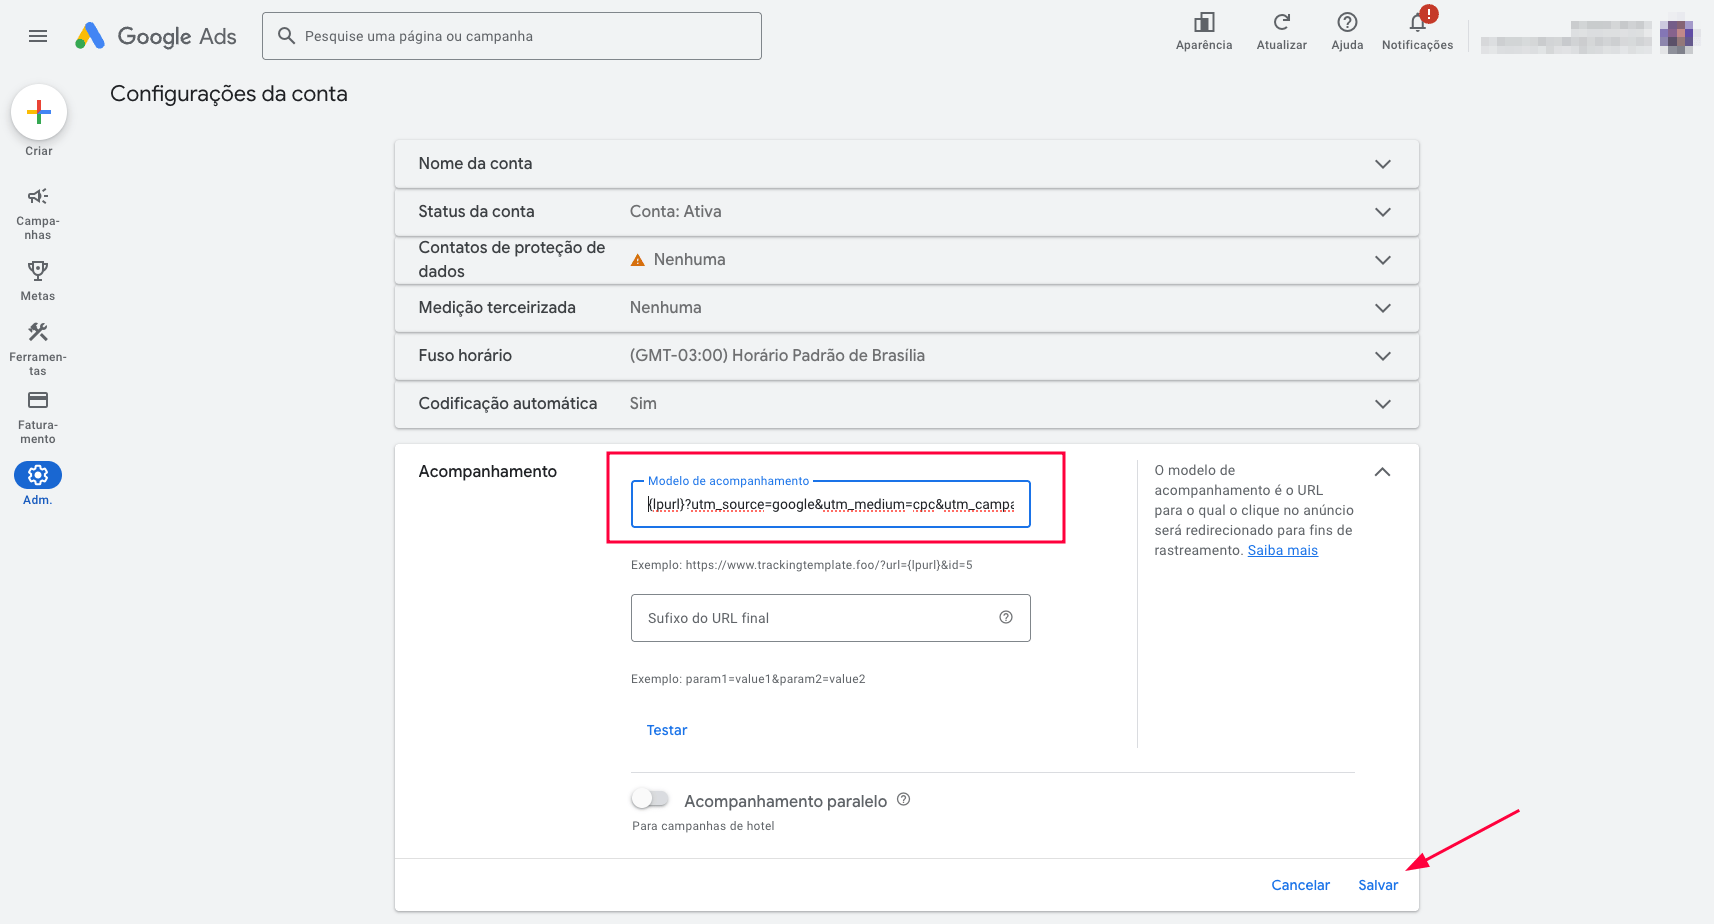
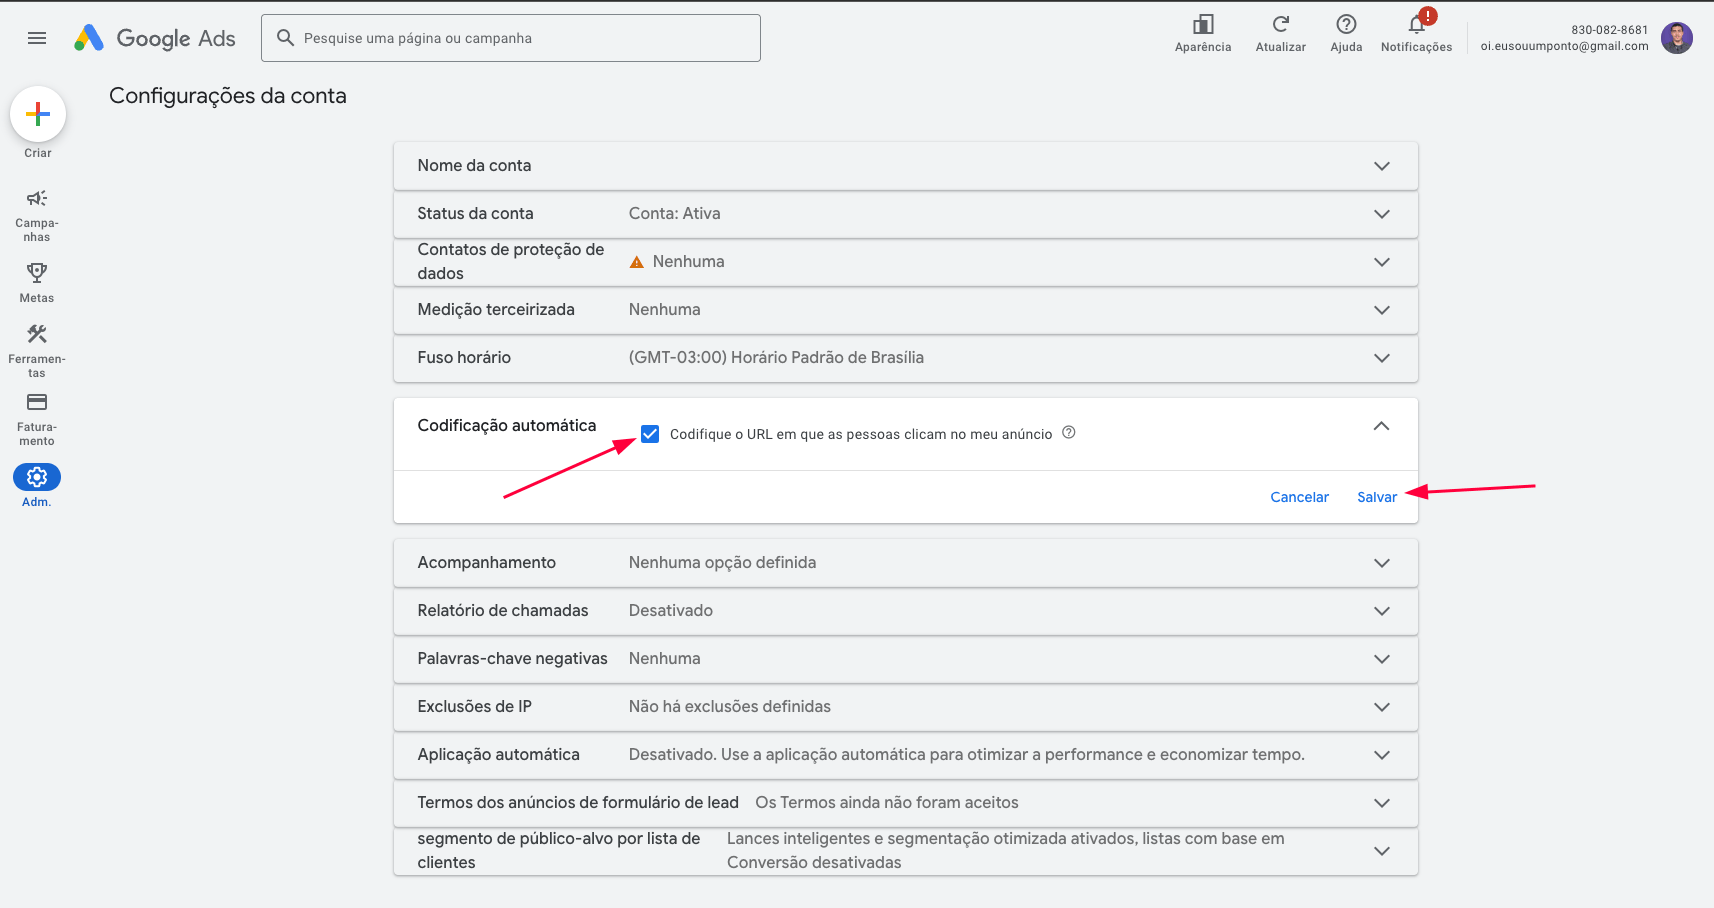 4. Click on **Tracking** copy and paste the configuration according to your checkout and click on **Save**.
* You don't need to remove existing UTMs, just add the `nemu_` parameters at the end of yours.
* If your checkout is different from Hotmart or Hotmart Affiliates, use the Standard configuration.
4. Click on **Tracking** copy and paste the configuration according to your checkout and click on **Save**.
* You don't need to remove existing UTMs, just add the `nemu_` parameters at the end of yours.
* If your checkout is different from Hotmart or Hotmart Affiliates, use the Standard configuration.
 ```text Standard: wrap theme={null}
Existing UTMs + &nemu_source=google&nemu_campaign={campaignid}&nemu_adset={adgroupid}&nemu_content={creative}&nemu_term={keyword}
```
```text Hotmart: wrap theme={null}
Existing UTMs + &nemu_source=google&nemu_campaign={campaignid}&nemu_adset={adgroupid}&nemu_content={creative}&nemu_term={keyword}
```
```text Hotmart Affiliates: wrap theme={null}
Existing UTMs + &nemu_source=google&nemu_campaign={campaignid}&nemu_adset={adgroupid}&nemu_content={creative}&nemu_term={keyword}
```
> **Example of how your final destination URL should look with Standard Checkout:**
```text Standard: wrap theme={null}
https://www.example.com/product?utm_source=google&utm_medium=cpc&utm_campaign=promo_july&nemu_source=google&nemu_campaign={campaignid}&nemu_adset={adgroupid}&nemu_content={creative}&nemu_term={keyword}
```
***
## Without UTMs configured
1. Sign in to Google Ads.
2. Click on **Settings** and then **Account settings**.
3. Click on **Auto-tagging**, if it's disabled, **enable it** and click on **Save**.
4. Click on **Tracking** copy and paste the configuration according to your checkout and click on **Save**.
If your checkout is different from Hotmart or Hotmart Affiliates, use the Standard configuration.
```text Standard: wrap theme={null}
{lpurl}?utm_source=google&utm_medium=cpc&utm_campaign={campaignid}_{adgroupid}&utm_content={creative}&utm_term={keyword}&nemu_source=google&nemu_campaign={campaignid}&nemu_adset={adgroupid}&nemu_content={creative}&nemu_term={keyword}
```
```text Hotmart: wrap theme={null}
{lpurl}?src=google|{creative}|{adgroupid}|{campaignid}|{keyword}&nemu_source=google&nemu_campaign={campaignid}&nemu_adset={adgroupid}&nemu_content={creative}&nemu_term={keyword}
```
```text Hotmart Affiliates: wrap theme={null}
{lpurl}?sck=google|{creative}|{adgroupid}|{campaignid}|{keyword}&nemu_source=google&nemu_campaign={campaignid}&nemu_adset={adgroupid}&nemu_content={creative}&nemu_term={keyword}
```
**Complete Example of Final URL with Standard Checkout:**
```text Standard: wrap theme={null}
https://www.example.com/product?utm_source=google&utm_medium=cpc&utm_campaign=promo_july&nemu_source=google&nemu_campaign={campaignid}&nemu_adset={adgroupid}&nemu_content={creative}&nemu_term={keyword}
```
```text Standard: wrap theme={null}
Existing UTMs + &nemu_source=google&nemu_campaign={campaignid}&nemu_adset={adgroupid}&nemu_content={creative}&nemu_term={keyword}
```
```text Hotmart: wrap theme={null}
Existing UTMs + &nemu_source=google&nemu_campaign={campaignid}&nemu_adset={adgroupid}&nemu_content={creative}&nemu_term={keyword}
```
```text Hotmart Affiliates: wrap theme={null}
Existing UTMs + &nemu_source=google&nemu_campaign={campaignid}&nemu_adset={adgroupid}&nemu_content={creative}&nemu_term={keyword}
```
> **Example of how your final destination URL should look with Standard Checkout:**
```text Standard: wrap theme={null}
https://www.example.com/product?utm_source=google&utm_medium=cpc&utm_campaign=promo_july&nemu_source=google&nemu_campaign={campaignid}&nemu_adset={adgroupid}&nemu_content={creative}&nemu_term={keyword}
```
***
## Without UTMs configured
1. Sign in to Google Ads.
2. Click on **Settings** and then **Account settings**.
3. Click on **Auto-tagging**, if it's disabled, **enable it** and click on **Save**.
4. Click on **Tracking** copy and paste the configuration according to your checkout and click on **Save**.
If your checkout is different from Hotmart or Hotmart Affiliates, use the Standard configuration.
```text Standard: wrap theme={null}
{lpurl}?utm_source=google&utm_medium=cpc&utm_campaign={campaignid}_{adgroupid}&utm_content={creative}&utm_term={keyword}&nemu_source=google&nemu_campaign={campaignid}&nemu_adset={adgroupid}&nemu_content={creative}&nemu_term={keyword}
```
```text Hotmart: wrap theme={null}
{lpurl}?src=google|{creative}|{adgroupid}|{campaignid}|{keyword}&nemu_source=google&nemu_campaign={campaignid}&nemu_adset={adgroupid}&nemu_content={creative}&nemu_term={keyword}
```
```text Hotmart Affiliates: wrap theme={null}
{lpurl}?sck=google|{creative}|{adgroupid}|{campaignid}|{keyword}&nemu_source=google&nemu_campaign={campaignid}&nemu_adset={adgroupid}&nemu_content={creative}&nemu_term={keyword}
```
**Complete Example of Final URL with Standard Checkout:**
```text Standard: wrap theme={null}
https://www.example.com/product?utm_source=google&utm_medium=cpc&utm_campaign=promo_july&nemu_source=google&nemu_campaign={campaignid}&nemu_adset={adgroupid}&nemu_content={creative}&nemu_term={keyword}
```