> ## Documentation Index
> Fetch the complete documentation index at: https://docs.nemu.com.br/llms.txt
> Use this file to discover all available pages before exploring further.
# Elementor
> This tutorial is for those who have a page on Elementor and want to use a pre-checkout form to capture customer information. Let's learn how to track UTM parameters by creating URL parameters in Elementor, similar to creating form fields.
## Tracking UTM Parameters in Elementor
### 1. Identifying UTM Fields
First, you must identify the fields that will be used according to your checkout. Here are the typical fields:
**For Hotmart:**
* `src`
* `sck`
**For other checkouts:**
* utm\_source
* utm\_campaign
* utm\_medium
* utm\_content
These names should be used in all identification fields of the field being created.
### 2. Creating Variables in Elementor
Now, let's create variables in Elementor to track UTM parameters.
**Step 1: Adding New Variables**
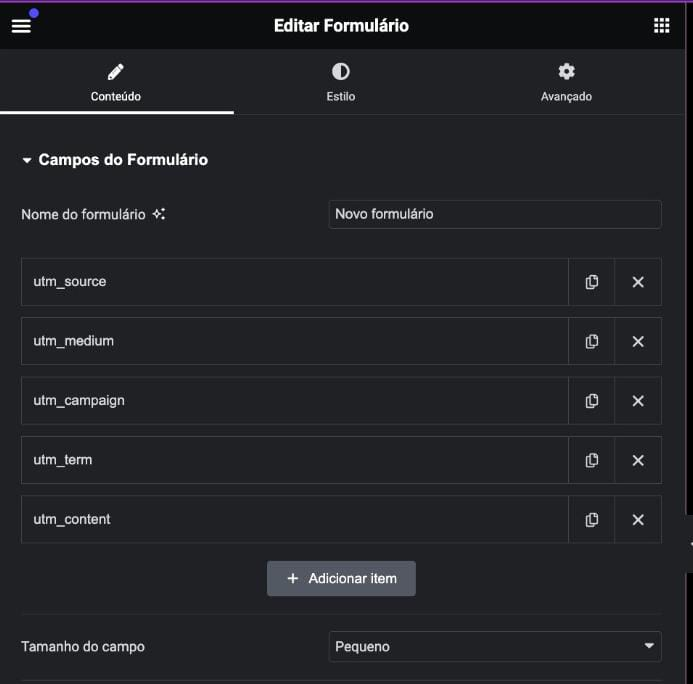
* First you must find the edit menu of your form similar to the figure below.
* Create a new variable for each field listed above.
 ### 2. Defining ID and Shortcode
**In Content:**
* Set the parameter type to `hidden`.
**In Advanced:**
* Set the default value to **Query Parameter**.
* When setting the default value, **advanced settings** will appear, in them you must set the type to `GET` and the parameter name referring to the current parameter.
* Define a unique ID for each variable.
* Generate the corresponding shortcode for each variable.
### 4. Adding Variables to the Redirect URL
With the fields created, now you need to add the shortcodes of each field to the URL of the redirect function of your form. This will ensure UTM parameters are passed correctly to the checkout.
**URL Example**
Here is an example of how the URL can be structured:
`https://www.meucheckout.com/?email=[field id="email"]&src=[field id="src"]`
### 5. Finalizing the Configuration
* Save all settings in Elementor.
* Test the pre-checkout form to ensure UTM parameters are being tracked and passed correctly to the checkout.
## Additional Tips
* **Data Validation:** Make sure UTM parameter data is being captured correctly in your checkout system.
* **Tests:** Perform tests with different UTM parameters to verify functionality and accuracy.
## Tracking Code
The code below is an example of how you can track UTM parameters in the Elementor form.
```html theme={null}
```
### 2. Defining ID and Shortcode
**In Content:**
* Set the parameter type to `hidden`.
**In Advanced:**
* Set the default value to **Query Parameter**.
* When setting the default value, **advanced settings** will appear, in them you must set the type to `GET` and the parameter name referring to the current parameter.
* Define a unique ID for each variable.
* Generate the corresponding shortcode for each variable.
### 4. Adding Variables to the Redirect URL
With the fields created, now you need to add the shortcodes of each field to the URL of the redirect function of your form. This will ensure UTM parameters are passed correctly to the checkout.
**URL Example**
Here is an example of how the URL can be structured:
`https://www.meucheckout.com/?email=[field id="email"]&src=[field id="src"]`
### 5. Finalizing the Configuration
* Save all settings in Elementor.
* Test the pre-checkout form to ensure UTM parameters are being tracked and passed correctly to the checkout.
## Additional Tips
* **Data Validation:** Make sure UTM parameter data is being captured correctly in your checkout system.
* **Tests:** Perform tests with different UTM parameters to verify functionality and accuracy.
## Tracking Code
The code below is an example of how you can track UTM parameters in the Elementor form.
```html theme={null}
```