> ## Documentation Index
> Fetch the complete documentation index at: https://docs.nemu.com.br/llms.txt
> Use this file to discover all available pages before exploring further.

# Hotmart

> How to connect Hotmart to Nemu Dashboard

## UTM Passing Script

### When to use

If you have a dedicated sales page, you need to install the UTM passing script on the Hotmart checkout page.

### Why it's important

The UTM passing script plays a crucial role in transferring UTM information from one page to another within your sales funnel, ensuring this data is tracked until the checkout moment.

### How to install

1. Access the checkout page of your offer on Hotmart
2. Add the script below in the `<head>` tag of the checkout page
3. Save the changes

```js UTM Passing Script theme={null}
<script>
   var timer = setInterval(function () {
      const location =
         window.trackingNemu?.nemuUtms ||
         new URL(document.location.href)?.searchParams;
      const fields = [
         "src",
         "sck",
         "utm_source",
         "utm_medium",
         "utm_campaign",
         "utm_content",
         "utm_term",
         "nemu_source",
         "nemu_medium",
         "nemu_campaign",
         "nemu_content",
         "nemu_adset",
         "nemu_term"
      ];
      var links = document.getElementsByTagName("a");

      for (var i = 0, n = links.length; i < n; i++) {
         if (links[i].href.includes("#")) continue;
         if (links[i].href) {
            let link = new URL(links[i].href);
            fields.forEach((field) => {
               if (location.get(field))
                  link.searchParams.set(field, location.get(field));
            });
            let href = link.href;
            links[i].href = href;
         }
      }
   }, 500);
</script>
```

### Tracked Parameters

The script automatically captures the following UTM parameters:

* **src** - Traffic source
* **sck** - Custom tracking key
* **utm\_source** - Campaign source
* **utm\_medium** - Marketing medium
* **utm\_campaign** - Campaign name
* **utm\_content** - Specific content
* **utm\_term** - Search terms

<Tip>
  **Tip:** The script runs automatically every 500ms, ensuring UTMs are captured even during quick page navigations.
</Tip>

## Setting Up Webhooks

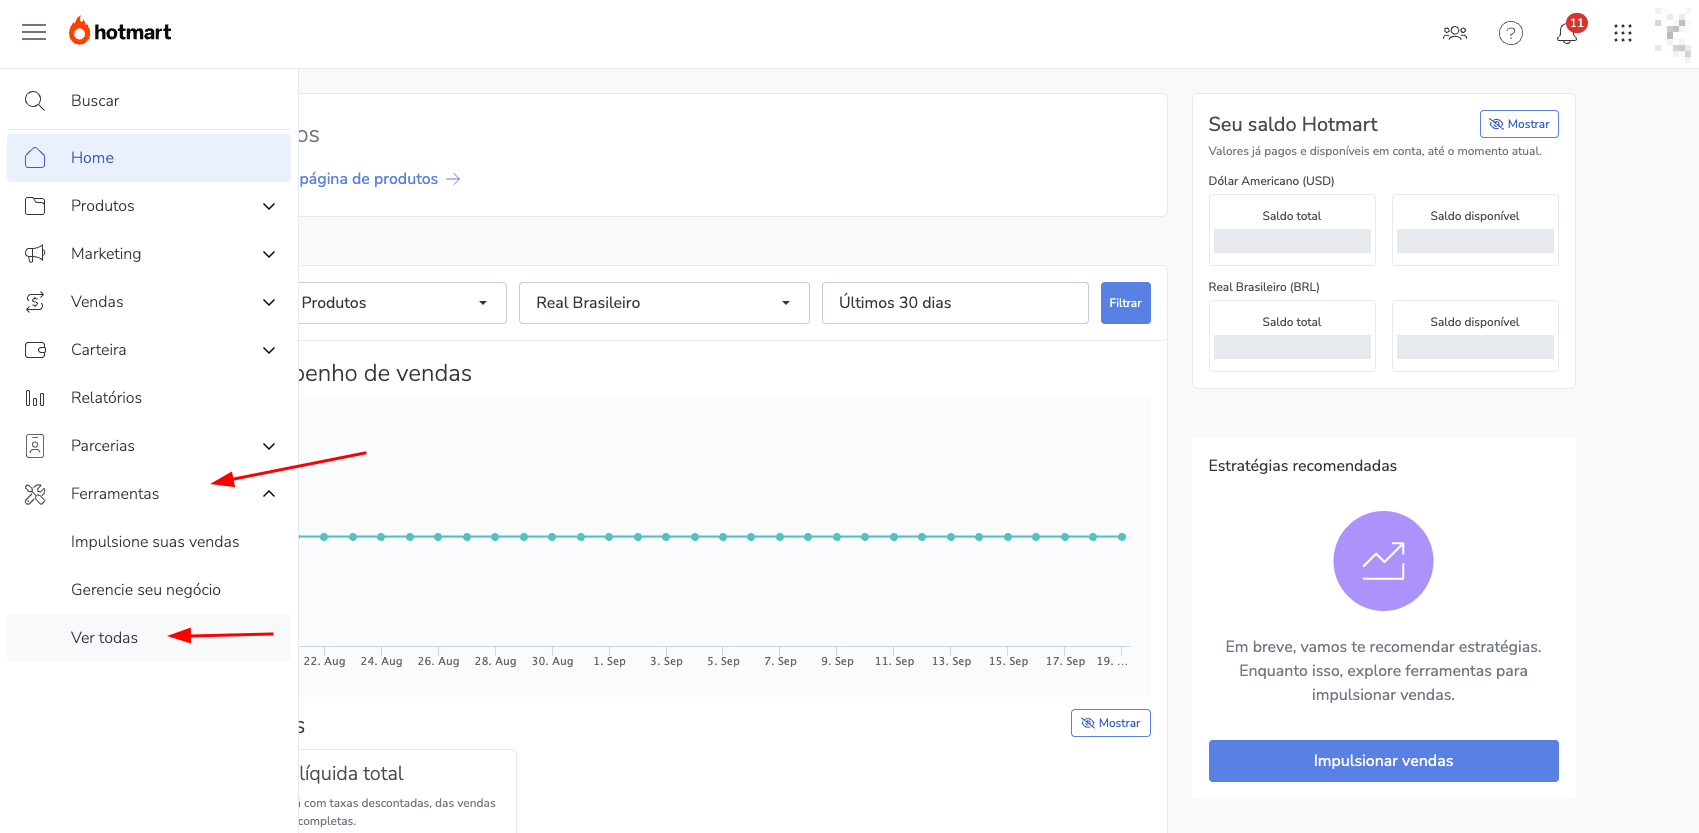
1. In the left sidebar, click on **Tools** and then on **View all**
<img src="https://mintcdn.com/nemu/AUpYFaItvLM9eog-/assets/pages/integracoes/hotmart/1.png?fit=max&auto=format&n=AUpYFaItvLM9eog-&q=85&s=2e4db66905ba48b4c32d7e1c4a9a7d79" alt="" width="1699" height="833" data-path="assets/pages/integracoes/hotmart/1.png" />

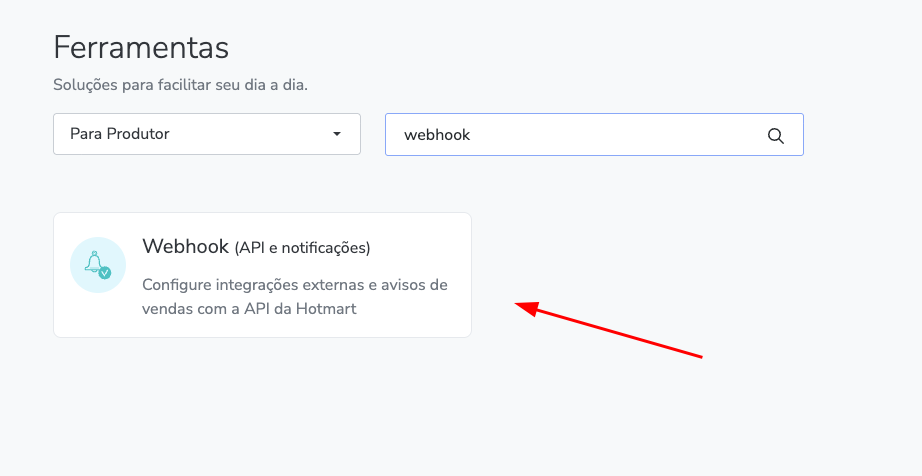
2. In the search bar, type: **Webhook** and click on the displayed card
<img src="https://mintcdn.com/nemu/AUpYFaItvLM9eog-/assets/pages/integracoes/hotmart/webhooks/2.png?fit=max&auto=format&n=AUpYFaItvLM9eog-&q=85&s=06898d546db38ce0e9d431651f1bcd4c" alt="" width="922" height="476" data-path="assets/pages/integracoes/hotmart/webhooks/2.png" />

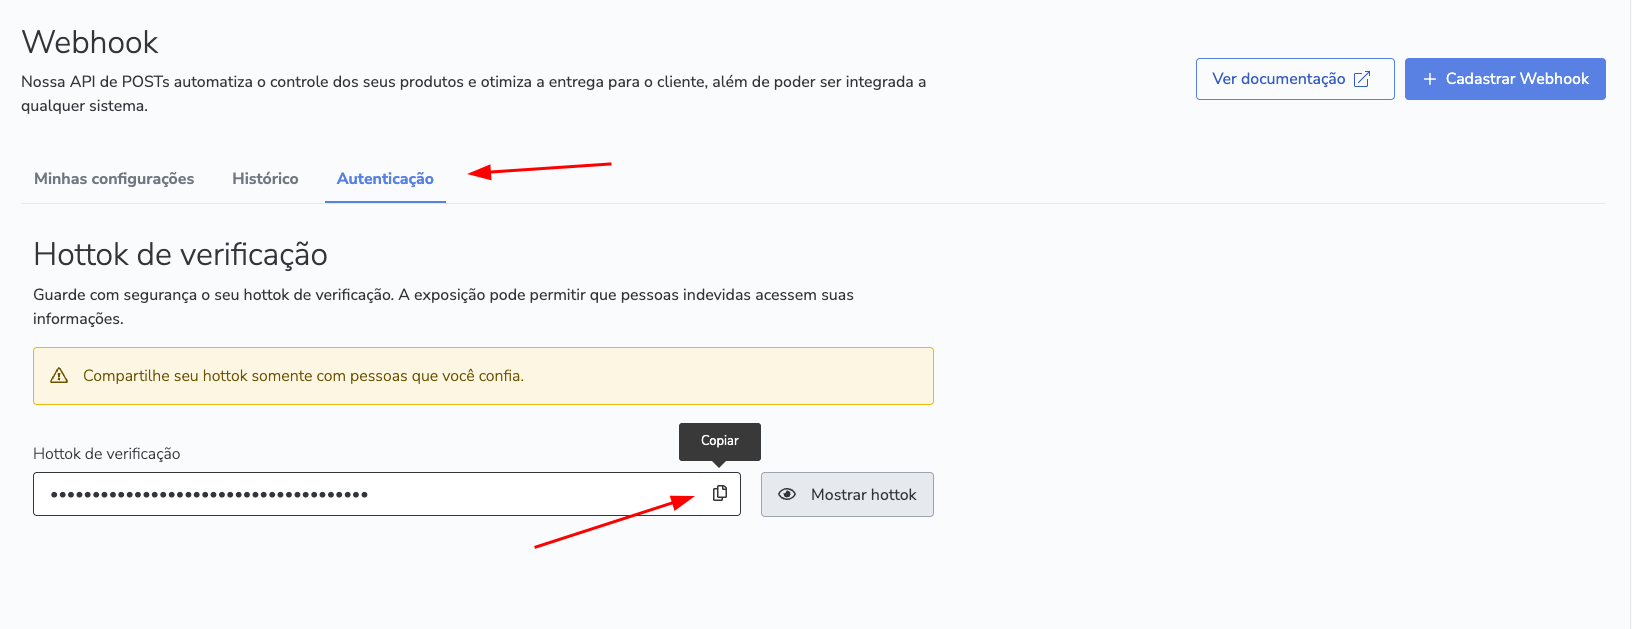
3. Go to the **Authentication** tab and click on **Copy** to copy the **Verification Hottok**
<img src="https://mintcdn.com/nemu/AUpYFaItvLM9eog-/assets/pages/integracoes/hotmart/webhooks/3.png?fit=max&auto=format&n=AUpYFaItvLM9eog-&q=85&s=7b59ddb1fddd0505a2a30cabebc0e206" alt="" width="1632" height="629" data-path="assets/pages/integracoes/hotmart/webhooks/3.png" />

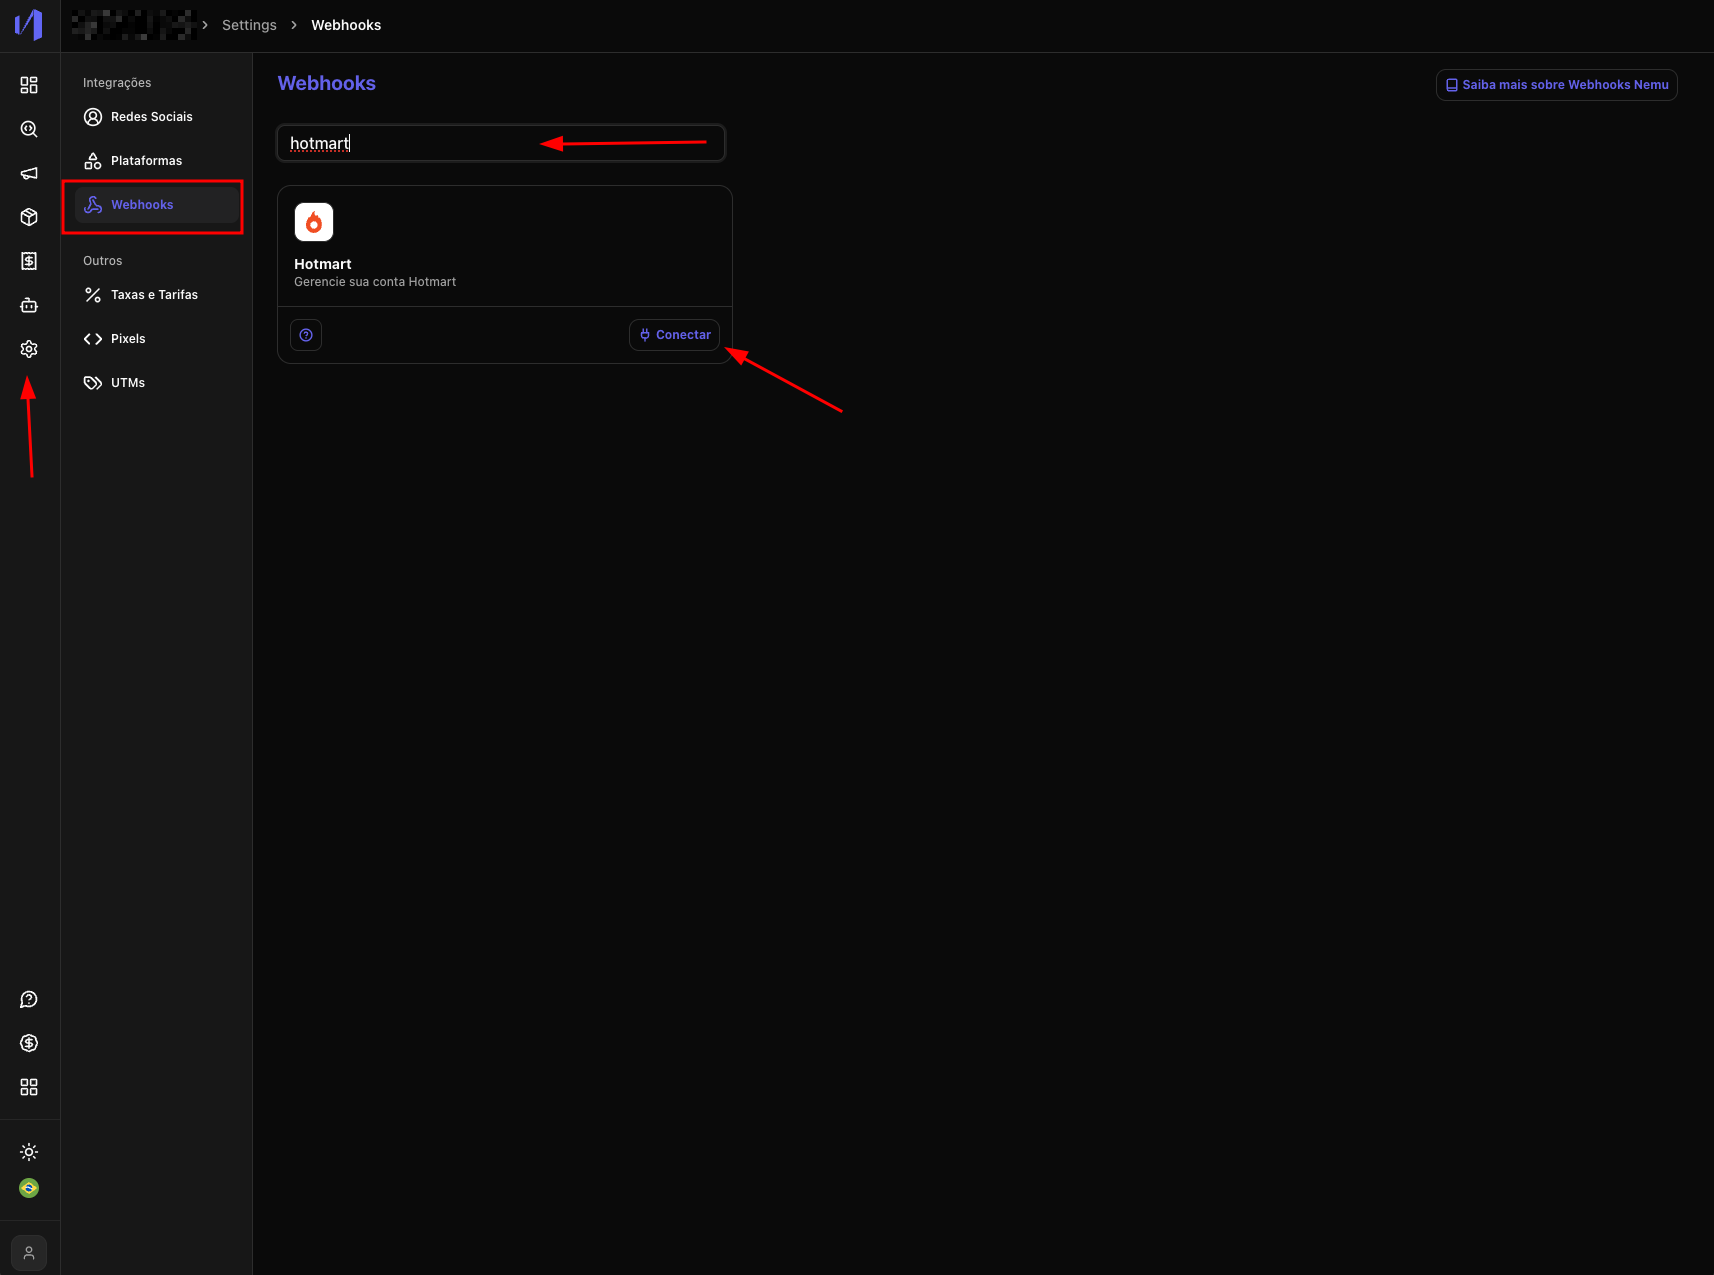
4. In Nemu, go to **Settings** > **Webhooks**, search for **Hotmart** and click on **Connect**
<img src="https://mintcdn.com/nemu/AUpYFaItvLM9eog-/assets/pages/integracoes/hotmart/webhooks/1.png?fit=max&auto=format&n=AUpYFaItvLM9eog-&q=85&s=6b193390df5036c3a0278d7963898de3" alt="" width="1714" height="1275" data-path="assets/pages/integracoes/hotmart/webhooks/1.png" />

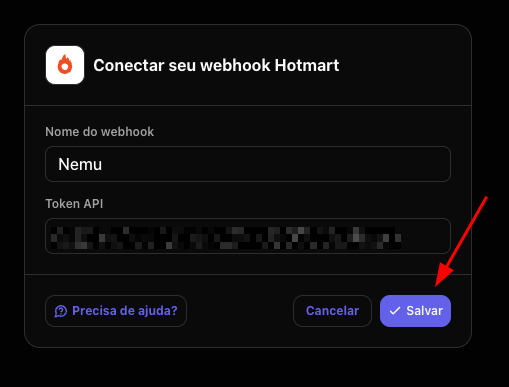
5. Define a name for your Webhook, paste your **Hottok** copied in **step 3** and click on **Save**
<img src="https://mintcdn.com/nemu/AUpYFaItvLM9eog-/assets/pages/integracoes/hotmart/webhooks/4.png?fit=max&auto=format&n=AUpYFaItvLM9eog-&q=85&s=a0e9020b7cbd39a9696150b0386ed82f" alt="" width="509" height="387" data-path="assets/pages/integracoes/hotmart/webhooks/4.png" />

6. Copy the **Webhook URL** generated.

<img src="https://mintcdn.com/nemu/w_LOeVHkZxi-c4ax/assets/pages/integracoes/hotmart/webhooks/6.png?fit=max&auto=format&n=w_LOeVHkZxi-c4ax&q=85&s=c5b12e9dea8b7b3dabe565376294499a" alt="" width="1210" height="760" data-path="assets/pages/integracoes/hotmart/webhooks/6.png" />

7. Go back to Hotmart and click on the **+ Register Webhook** button

<img src="https://mintcdn.com/nemu/w_LOeVHkZxi-c4ax/assets/pages/integracoes/hotmart/webhooks/7.png?fit=max&auto=format&n=w_LOeVHkZxi-c4ax&q=85&s=aff549ab5e58373365704a9b5b391ac1" alt="" width="3338" height="1786" data-path="assets/pages/integracoes/hotmart/webhooks/7.png" />

8. Fill in the fields with the information from **step 6** and click on **Save**

<img src="https://mintcdn.com/nemu/w_LOeVHkZxi-c4ax/assets/pages/integracoes/hotmart/webhooks/8.png?fit=max&auto=format&n=w_LOeVHkZxi-c4ax&q=85&s=98a3453da86c37631378cea048f7362e" alt="" width="1016" height="1844" data-path="assets/pages/integracoes/hotmart/webhooks/8.png" />

9. In events, select All and click on **Save**

<img src="https://mintcdn.com/nemu/w_LOeVHkZxi-c4ax/assets/pages/integracoes/hotmart/webhooks/9.png?fit=max&auto=format&n=w_LOeVHkZxi-c4ax&q=85&s=450e268662716af4bf0b43963e568acd" alt="" width="1040" height="1008" data-path="assets/pages/integracoes/hotmart/webhooks/9.png" />
